유니티 쓰레드(Task)사용 시 메인쓰레드에서 호출되도록 하는 방법
카테고리 없음2021. 5. 13. 11:23


Task를 실행 후 ContinueWith로 콜백을 실행할 때 두번째 인자로 TaskScheduler.FromCurrentSynchronizationContext()를 넘겨주면 메인쓰레드에서 실행한다.
별도의 MainthreadDispatcher를 사용하지 않아도 된다.
댓글()
Task를 실행 후 ContinueWith로 콜백을 실행할 때 두번째 인자로 TaskScheduler.FromCurrentSynchronizationContext()를 넘겨주면 메인쓰레드에서 실행한다.
별도의 MainthreadDispatcher를 사용하지 않아도 된다.
Project Settings 윈도우에서 비밀번호를 입력할 수 있으며, 유니티를 끄고 켜도 입력이 유지된다.
#if UNITY_ANDROID
using System.Collections;
using System.Collections.Generic;
using UnityEngine;
using UnityEditor;
using UnityEditor.Callbacks;

namespace Waker.BuildTools
{
    public partial class AndroidKeystore : ScriptableObject
    {
        public const string CustomSettingsPath = "Assets/Editor/Android Keystore Password.asset";

        [SerializeField] private string keystorePassword;
        [SerializeField] private string keyaliasPassword;

        public void UpdatePlayerSettings()
        {
            var i = GetOrCreateSettings();

            PlayerSettings.Android.keystorePass = i.keystorePassword;
            PlayerSettings.Android.keyaliasPass = i.keyaliasPassword;
        }

        internal static AndroidKeystore GetOrCreateSettings()
        {
            var settings = AssetDatabase.LoadAssetAtPath<AndroidKeystore>(CustomSettingsPath);
            if (settings == null)
            {
                settings = ScriptableObject.CreateInstance<AndroidKeystore>();
                AssetDatabase.CreateAsset(settings, CustomSettingsPath);
                AssetDatabase.SaveAssets();
            }
            return settings;
        }

        internal static SerializedObject GetSerializedSettings()
        {
            return new SerializedObject(GetOrCreateSettings());
        }

        [SettingsProvider]
        public static SettingsProvider CreateSettingsProvider()
        {
            // First parameter is the path in the Settings window.
            // Second parameter is the scope of this setting: it only appears in the Project Settings window.
            var provider = new SettingsProvider("Project/Waker/Android Keystore Password", SettingsScope.Project)
            {
                // By default the last token of the path is used as display name if no label is provided.
                label = "Android Keystore Password",
                // Create the SettingsProvider and initialize its drawing (IMGUI) function in place:
                guiHandler = (searchContext) =>
                {
                    var settings = AndroidKeystore.GetSerializedSettings();

                    settings.Update();

                    EditorGUILayout.PropertyField(settings.FindProperty("keystorePassword"), new GUIContent("keystorePassword"));
                    EditorGUILayout.PropertyField(settings.FindProperty("keyaliasPassword"), new GUIContent("keyaliasPassword"));

                    settings.ApplyModifiedProperties();

                    if (GUILayout.Button("Update"))
                    {
                        AndroidKeystore.GetOrCreateSettings().UpdatePlayerSettings();
                    }
                },

                // Populate the search keywords to enable smart search filtering and label highlighting:
                // keywords = new HashSet<string>(new[] { "Number", "Some String" })
            };

            return provider;
        }
    }
}
#endif
System.Version클래스를 이용해 시멘틱 버전을 관리한다.
C# System.Version 문서를 보면 다음과 같은 내용이 나온다.
버전 번호는 주 버전, 부 버전, 빌드 버전 및 수정 버전의 구성 요소로 구성 됩니다. 주 및 보조 구성 요소가 필요 합니다. 빌드 및 수정 구성 요소는 선택 사항 이지만 수정 구성 요소가 정의 되어 있으면 빌드 구성 요소가 필요 합니다. 정의 된 모든 구성 요소는 0 보다 크거나 같은 정수 여야 합니다. 버전 번호의 형식은 다음과 같습니다. 선택적 구성 요소는 대괄호 ([및])로 표시 됩니다.
주. minor[.빌드[.수정 버전]]구성 요소는 규칙에 따라 다음과 같이 사용 됩니다.
여기에서 유니티를 빌드할 때에 빌드 버전을 자동으로 증가시키는 스크립트를 작성한다.
namespace Waker.BuildTools
{
	public class VersionUpdater : ScriptableObject
    {
        [SerializeField] private int major;
        [SerializeField] private int minor;
        [SerializeField] private int build;

        public Version GetVersion()
        {
            return new System.Version(major, minor, build);
        }

		// 빌드 버전을 증가시키고 유니티 플레이어 셋팅에 적용
        private void IncreaseBuild()
        {
            build++;
            UpdatePlayerSettings();
        }

		// 버전을 플레이어 셋팅에 적용
        public void UpdatePlayerSettings()
        {
            PlayerSettings.bundleVersion = GetVersion().ToString(3);

            // 안드로이드일 경우 번들 버전도 같이 증가
#if UNITY_ANDROID
            PlayerSettings.Android.bundleVersionCode = build;
#endif
        }
    }
}
IncreaseBuild를 호출하여 빌드 버전을 자동으로 증가시킬 수 있다.
internal static VersionUpdater GetOrCreateSettings()
{
    var settings = AssetDatabase.LoadAssetAtPath<VersionUpdater>(CustomSettingsPath);
    if (settings == null)
    {
        settings = ScriptableObject.CreateInstance<VersionUpdater>();
        settings.major = 1;
        settings.minor = 1;
        settings.build = 0;
        AssetDatabase.CreateAsset(settings, CustomSettingsPath);
        AssetDatabase.SaveAssets();
    }
    return settings;
}

[PostProcessBuildAttribute(1)]
public static void OnPostprocessBuild(BuildTarget target, string pathToBuiltProject)
{
    var i = GetOrCreateSettings();
    i.IncreaseBuild();

    EditorUtility.SetDirty(i);
}
PostProcessBuildAttribute를 이용해 빌드 작업 후 빌드 버전을 자동으로 증가시킬 수 있다.
internal static SerializedObject GetSerializedSettings()
{
    return new SerializedObject(GetOrCreateSettings());
}

[SettingsProvider]
public static SettingsProvider CreateSettingsProvider()
{
    // First parameter is the path in the Settings window.
    // Second parameter is the scope of this setting: it only appears in the Project Settings window.
    var provider = new SettingsProvider("Project/Waker/Version Updater", SettingsScope.Project)
    {
        // By default the last token of the path is used as display name if no label is provided.
        label = "Version Updater",
        // Create the SettingsProvider and initialize its drawing (IMGUI) function in place:
        guiHandler = (searchContext) =>
        {
            var settings = VersionUpdater.GetSerializedSettings();

            settings.Update();

            EditorGUILayout.PropertyField(settings.FindProperty("major"), new GUIContent("major"));
            EditorGUILayout.PropertyField(settings.FindProperty("minor"), new GUIContent("minor"));
            EditorGUILayout.PropertyField(settings.FindProperty("build"), new GUIContent("build"));

            settings.ApplyModifiedProperties();

            if (GUILayout.Button("Version Update"))
            {
                VersionUpdater.GetOrCreateSettings().UpdatePlayerSettings();
            }
        },

    // Populate the search keywords to enable smart search filtering and label highlighting:
    // keywords = new HashSet<string>(new[] { "Number", "Some String" })
    };

    return provider;
}
SettingsProvider를 이용해 프로젝트 셋팅에서 값을 설정할 수 있다.
using System;
using System.Collections;
using System.Collections.Generic;
using UnityEngine;
using UnityEditor;
using UnityEditor.Callbacks;

namespace Waker.BuildTools
{
    public class VersionUpdater : ScriptableObject
    {
        public const string CustomSettingsPath = "Assets/Editor/Version Updater.asset";

        [SerializeField] private int major;
        [SerializeField] private int minor;
        [SerializeField] private int build;

        public Version GetVersion()
        {
            return new Version(major, minor, build);
        }

        private void IncreaseBuild()
        {
            build++;
            UpdatePlayerSettings();
        }

        public void UpdatePlayerSettings()
        {
            PlayerSettings.bundleVersion = GetVersion().ToString(3);
#if UNITY_ANDROID
            PlayerSettings.Android.bundleVersionCode = build;
#endif
        }

        internal static VersionUpdater GetOrCreateSettings()
        {
            var settings = AssetDatabase.LoadAssetAtPath<VersionUpdater>(CustomSettingsPath);
            if (settings == null)
            {
                settings = ScriptableObject.CreateInstance<VersionUpdater>();
                settings.major = 1;
                settings.minor = 1;
                settings.build = 0;
                AssetDatabase.CreateAsset(settings, CustomSettingsPath);
                AssetDatabase.SaveAssets();
            }
            return settings;
        }

        internal static SerializedObject GetSerializedSettings()
        {
            return new SerializedObject(GetOrCreateSettings());
        }

        [PostProcessBuildAttribute(1)]
        public static void OnPostprocessBuild(BuildTarget target, string pathToBuiltProject)
        {
            var i = GetOrCreateSettings();
            var prevVersion = i.GetVersion();
            i.IncreaseBuild();

            EditorUtility.SetDirty(i);

            Debug.Log($"VersionUpdater Previous Version is {prevVersion}, Current Version is {i.GetVersion()}.");
        }

        [SettingsProvider]
        public static SettingsProvider CreateSettingsProvider()
        {
            // First parameter is the path in the Settings window.
            // Second parameter is the scope of this setting: it only appears in the Project Settings window.
            var provider = new SettingsProvider("Project/Waker/Version Updater", SettingsScope.Project)
            {
                // By default the last token of the path is used as display name if no label is provided.
                label = "Version Updater",
                // Create the SettingsProvider and initialize its drawing (IMGUI) function in place:
                guiHandler = (searchContext) =>
                {
                    var settings = VersionUpdater.GetSerializedSettings();

                    settings.Update();

                    EditorGUILayout.PropertyField(settings.FindProperty("major"), new GUIContent("major"));
                    EditorGUILayout.PropertyField(settings.FindProperty("minor"), new GUIContent("minor"));
                    EditorGUILayout.PropertyField(settings.FindProperty("build"), new GUIContent("build"));

                    settings.ApplyModifiedProperties();

                    if (GUILayout.Button("Version Update"))
                    {
                        VersionUpdater.GetOrCreateSettings().UpdatePlayerSettings();
                    }
                },

                // Populate the search keywords to enable smart search filtering and label highlighting:
                // keywords = new HashSet<string>(new[] { "Number", "Some String" })
            };

            return provider;
        }
    }
}
// 코드를 받아 스크립트를 생성하거나 업데이트 하는 함수
private void CreateScript(string path, string code)
{
    File.WriteAllText("Assets/" + path, code);
    AssetDatabase.Refresh();
}
Path와 코드 내용을 입력받아 해당 Path에 스크립트를 생성할 수 있다.
다음은 팝업 접근에 용이하도록 MyPopups.cs를 생성하는 에디터 코드이다.
using System;
using System.Collections.Generic;
using System.IO;
using System.Linq;
using System.Text;
using UnityEditor;
using UnityEngine;

namespace Waker.Popups.Editors
{
    [CustomEditor(typeof(PopupController))]
    public class PopupControllerEditor : Editor
    {
        public override void OnInspectorGUI()
        {
            base.OnInspectorGUI();

            if (GUILayout.Button("Generate MyPopups.cs"))
            {
                PopupController instance = target as PopupController;

                var popups = instance.GetComponentsInChildren<PopupBase>();
                string code = CreateCode(popups);
                CreateScript(code);
            }
        }

        private string CreateCode(IEnumerable<PopupBase> popups)
        {
            StringBuilder sb = new StringBuilder();

            sb.AppendLine("using Waker.Popups;");
            sb.AppendLine("// PopupController.cs에 의해 자동으로 생성된 스크립트입니다. 네임스페이스를 추가하거나 에러를 수정하는 등 자유롭게 수정 가능합니다.");
            sb.AppendLine("public static class MyPopups");
            sb.AppendLine("{");

            foreach (var popup in popups)
            {
                string typeName = popup.GetType().Name;
                string popupName = popup.PopupName;
                string propertyName = String.Concat(popupName.Where(c => !Char.IsWhiteSpace(c)));
                sb.AppendLine($"\tpublic static {typeName} {propertyName} => PopupController.Instance.Get<{typeName}>(\"{popupName}\");");
            }

            sb.AppendLine("}");

            return sb.ToString();
        }

		// 코드를 받아 스크립트를 생성하거나 업데이트 하는 함수
        private void CreateScript(string code)
        {
            File.WriteAllText("Assets/MyPopups.cs", code);
            AssetDatabase.Refresh();
        }
    }

}| BigInteger를 유닛 단위 문자열로 변환하는 함수 (0) | 2020.12.27 |
|---|---|
| 유니티 UGUI 드래그 앤 드랍 (0) | 2020.11.11 |
| 유니티 Android SDK 업데이트 (0) | 2020.10.03 |
| 유니티에서 다국어 폰트 지원하는 방법 (1) | 2020.10.01 |
| Pagination of IEnumerable<T> (0) | 2020.09.29 |
| 에디터 스크립트에서 직접 스크립트를 생성하는 방법 (0) | 2021.03.10 |
|---|---|
| 유니티 UGUI 드래그 앤 드랍 (0) | 2020.11.11 |
| 유니티 Android SDK 업데이트 (0) | 2020.10.03 |
| 유니티에서 다국어 폰트 지원하는 방법 (1) | 2020.10.01 |
| Pagination of IEnumerable<T> (0) | 2020.09.29 |
| 에디터 스크립트에서 직접 스크립트를 생성하는 방법 (0) | 2021.03.10 |
|---|---|
| BigInteger를 유닛 단위 문자열로 변환하는 함수 (0) | 2020.12.27 |
| 유니티 Android SDK 업데이트 (0) | 2020.10.03 |
| 유니티에서 다국어 폰트 지원하는 방법 (1) | 2020.10.01 |
| Pagination of IEnumerable<T> (0) | 2020.09.29 |
| BigInteger를 유닛 단위 문자열로 변환하는 함수 (0) | 2020.12.27 |
|---|---|
| 유니티 UGUI 드래그 앤 드랍 (0) | 2020.11.11 |
| 유니티에서 다국어 폰트 지원하는 방법 (1) | 2020.10.01 |
| Pagination of IEnumerable<T> (0) | 2020.09.29 |
| BundleTool - 유니티에서 빌드된 aab 파일을 안드로이드에 설치 (0) | 2020.09.20 |
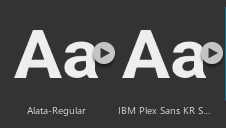
영어 폰트와 한글 폰트를 각각 적용하고 싶을 경우 둘 중 하나의 폰트를 선택 한 후, 글꼴 이름에서 추가하고자 하는 폰트의 이름을 추가하면 된다.
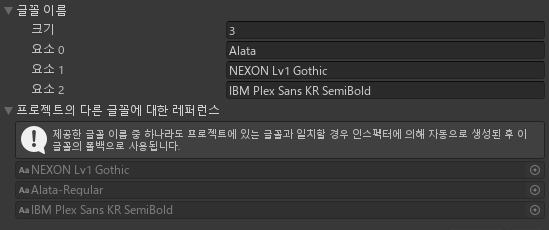
하나의 Text 컴포넌트에 여러가지 언어의 글자를 입력하면 자동으로 해당 언어를 지원하는 폰트를 적용해준다.
로컬라이징 에셋을 사용할 때 별도로 언어별 폰트를 지정해줄 필요 없이 이 방법을 사용하면 매우 간편하게 다국어를 지원할 수 있다.
| 유니티 UGUI 드래그 앤 드랍 (0) | 2020.11.11 |
|---|---|
| 유니티 Android SDK 업데이트 (0) | 2020.10.03 |
| Pagination of IEnumerable<T> (0) | 2020.09.29 |
| BundleTool - 유니티에서 빌드된 aab 파일을 안드로이드에 설치 (0) | 2020.09.20 |
| RepeatButton 누르고 있는 동안 이벤트가 반복 발생하는 버튼 (0) | 2020.08.30 |
| 유니티 Android SDK 업데이트 (0) | 2020.10.03 |
|---|---|
| 유니티에서 다국어 폰트 지원하는 방법 (1) | 2020.10.01 |
| BundleTool - 유니티에서 빌드된 aab 파일을 안드로이드에 설치 (0) | 2020.09.20 |
| RepeatButton 누르고 있는 동안 이벤트가 반복 발생하는 버튼 (0) | 2020.08.30 |
| 유니티에서 컴파일러 Warning 로그 제거하기 (0) | 2020.07.13 |
jdk와 sdk가 설치되어 있어야 하고, JAVA_HOME 환경변수를 등록해야 한다.
aab파일을 디바이스에 설치하기 위해서는 BundleTool이라는 파일이 필요하다. 다운로드 하는 위치는 다음과 같다.
https://github.com/google/bundletool/releases
bundletool을 실행하기 위한 명령어는 다음과 같다.
java -jar "./bundletool-all-1.2.0.jar" --versionA.aab 파일을 apks파일로 빌드한다. 현재 컴퓨터와 연결된 안드로이드에 맞도록 필터링 하려면 --connected-device 을 추가한다.
java -jar "./bundletool-all-1.2.0.jar" build-apks
    --connected-device
    --bundle="A.aab"
    --output="A.apks"
    --ks=key.keystore
    --ks-pass=pass:123456
    --ks-key-alias="alias"
    --key-pass=pass:123456
--adb="PATH_TO_SDK\\platform-tools\\adb.exe"빌드된 apks파일을 연결된 안드로이드에 설치한다.
java -jar "./bundletool-all-1.2.0.jar" install-apks
    --apks="A.apks"
--adb="PATH_TO_SDK\\platform-tools\\adb.exe"adb를 통해 설치된 앱을 안드로이드에서 실행한다.
PATH_TO_SDK\\platform-tools\\adb.exe shell monkey -p "PACKAGE_NAME" -c android.intent.category.LAUNCHER 1| 유니티에서 다국어 폰트 지원하는 방법 (1) | 2020.10.01 |
|---|---|
| Pagination of IEnumerable<T> (0) | 2020.09.29 |
| RepeatButton 누르고 있는 동안 이벤트가 반복 발생하는 버튼 (0) | 2020.08.30 |
| 유니티에서 컴파일러 Warning 로그 제거하기 (0) | 2020.07.13 |
| 엑셀의 모든 시트를 각각의 csv로 내보내기 (0) | 2020.07.12 |
